When weaving a project, it is important to know how you want to finish the item before even getting started with the weaving. Whether you would like to finish with a hem or fringes, you need to make sure that your warp is long enough to incorporate this finish. In case you want to finish a shawl with long twisted fringes, you need to leave long unwoven warp ends on both sides of the shawl. When you are making kitchen towels with hems, you need to take into account that every hem requires some extra centimeters of weaving on both sides of each towel. As a consequence, I always have a clear picture of the finishing in mind before winding a warp.

I have to confess, the finishing up is not my favorite part of making a handwoven item. When I take the project off the loom, I prefer it to be as much finished as possible. If only those fringes could twist themselves… However, I am well aware that a good finish can make all the difference in the final project. Hence, I always finish what I started. For shawls, I have one go-to-method for finishing: Italian hemstitch and twisted fringe. However, for one of my latest project, I decided to put a little spin on this tried and tested finishing.
Practicing patience
Finishing techniques can be either off-the-loom or on-the-loom. Twisting fringes and sewing hems are techniques that happen once the weaving is done and the project is taken off the loom. Hemstitching is usually done on the loom: with the warp ends neatly under tension, it is much easier to make those stitches. I have a bit of a love–hate relationship with hemstitching. I do not mind making the stitches and I love how they look, but the timing is always a bit unfortunate.


After hours of designing, yarn and color picking, warp winding, threading heddles and sleying, the warp is finally on the loom and ready to go. This moment is always so exciting: I finally will get to see what my design will look like in real life. Yet, after some centimeters of weaving and getting just a glimpse of the design, it is time for hemstitching… Those starting ends of the warp need to be stitched in place to obtain a neat finish and a good foundation for the twisted fringes. As said, I do not mind making the stitches. Yet, at this stage of the weaving process, I just want to keep on weaving and see my design evolve.
Naturally, the finishing ends of the warp also need hemstitching. This is the last part of the weaving, just before the project can be taken off the loom. After hours of weaving and gradually seeing my project appear and disappear on the cloth beam, I just want to take it off and see it in its entirety. Yet, first some hemstitching needs to be done. Again, the timing is just so unfortunate.

Of course, I am exaggerating my displeasure with hemstitching quite a bit. Yet, it is accurate to say that I sometimes have to practice my patience with hemstitching.
More is more
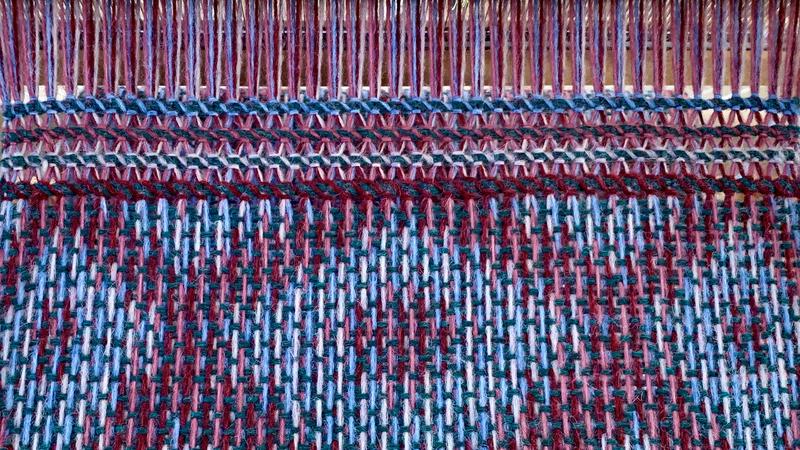
In one of my latest handwoven shawls, I decided to put my patience to quite a test. Instead of adding a single row of hemstitches, I added four. This shawl was my second project in a new-to-me weaving technique: turned taquete. I made this shawl for myself, just as a means to get to know this novel technique. Hence, I was able to experiment as I pleased. In the warp, I alternated four colors. Normally, I make the hemstitches with one of the colors used in either warp or weft. For this project, I just could not decide on which of the four warp colors to pick for the hemstitching. So, I decided to use all four colors in four rows of Italian hemstitch. The stitches of the subsequent rows are placed on an offset, which gives a nice interplay of the warp threads between the rows of stitches. In this case, more is more.


The hemstitching was a fun activity, especially once the interplay in warp threads became more clear. Yet, I was still quite happy when I placed my last stitch and was able to start weaving the turned taquete pattern I had designed. I had lots of fun weaving turned taquete and can easily see this technique becoming one of my favorites. I do have some tweaking to do though, as I was not able to weave to square with the sett I used for the warp. My pattern became quite elongated, which is an effect I luckily like.

My patience was again tested when I needed to make four more rows of hemstitching before I could take the shawl off the loom and see the end-result of my experiment. It was worth it though, as the rows of colored stitches really add a little extra to the shawl. So, this shawl was not only an experiment in weaving technique, but also in finishing technique. I can imagine I will use both techniques again in future projects. Sometimes, a little patience is all it takes.